أهم النقاط
1. إتقان الكرة والمستوى: أساس رسم الرأس
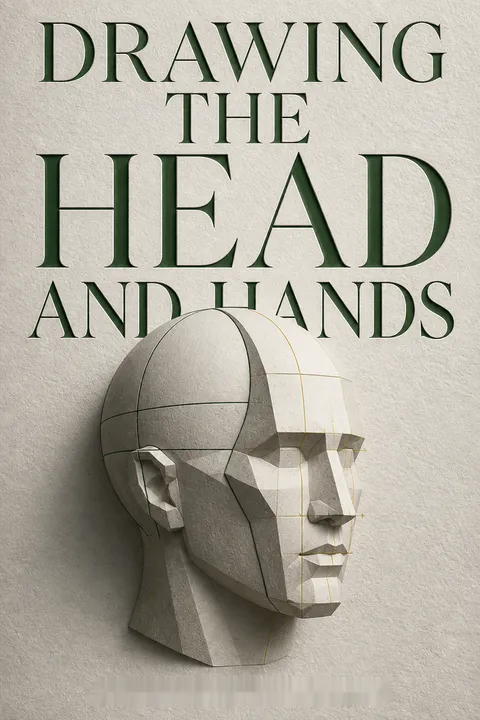
الشكل الأساسي هو كرة مسطحة.
ابدأ بالأساسيات. يشجع لوماس على البدء بشكل مبسط يشبه الجمجمة - كرة مسطحة - كأساس لرسم الرؤوس. يوفر هذا النهج قاعدة صلبة لبناء الجمجمة وإضافة ملامح الوجه، مما يضمن دقة النسب ووجهة النظر. من خلال تصور الرأس كشكل ثلاثي الأبعاد، يمكن للفنانين تجنب الفخ الشائع المتمثل في رسم وجوه مسطحة ثنائية الأبعاد.
خطوط البناء هي المفتاح. "الصليب"، الذي يتشكل من خط الحاجب والخط الأوسط للوجه، هو أمر حاسم لتحديد وضع الرأس ونسبه. تعمل هذه الخطوط كأدلة لوضع الملامح وضمان التماثل. تدرب على رسم الكرة والمستوى من زوايا مختلفة لتطوير فهم قوي لبناء الرأس.
فكر في الأبعاد الثلاثة. تخيل الجانب غير المرئي من الرأس كنسخة مكررة من الجانب المرئي. يساعد ذلك في خلق إحساس بالصلابة والحجم في رسوماتك. من خلال إتقان الكرة والمستوى، يمكنك بثقة بناء الرؤوس من أي زاوية، مما يمهد الطريق لتقنيات أكثر تقدمًا.
2. النسب والمسافات: مفتاح الشبه
يجب أن تأخذ الملامح أماكنها الصحيحة في بنائنا.
القياسات مهمة. النسب الدقيقة والمسافات ضرورية لالتقاط الشبه. المسافة من خط الحاجب إلى خط الشعر، وطول الأنف، والمسافة من الأنف إلى الذقن عادة ما تكون متساوية. استخدم هذه القياسات كنقطة انطلاق، ولكن كن واعيًا لوجود اختلافات فردية.
وحدات القياس. قسم الوجه إلى وحدات للمساعدة في تحديد النسب. يتناسب العرض الأمامي للرأس بشكل جيد ضمن مستطيل عرضه ثلاث وحدات وعمقه ثلاث وحدات ونصف. يتناسب العرض الجانبي ضمن مربع عرضه ثلاث وحدات ونصف في كل اتجاه. يمكن تقسيم هذه الوحدات بشكل أكبر لتحديد مواقع العينين والأنف والفم.
التركيز على المكان بدلاً من الكمال. ركز على وضع الملامح بشكل صحيح ضمن خطوط البناء قبل تحسين تفاصيلها. ميزة موضوعة بشكل جيد، حتى لو كانت بسيطة، تكون أكثر فعالية من ميزة موضوعة بشكل سيء، حتى لو كانت مصممة بدقة. من خلال إعطاء الأولوية لوضع دقيق، يمكنك إنشاء بورتريهات مقنعة وحيوية.
3. التشريح: فهم الهيكل الأساسي
من الجمجمة نحصل على توزيع الملامح، وهو أكثر أهمية للفنان من الملامح نفسها.
العظام والعضلات. بينما ليس من الضروري حفظ كل تفاصيل التشريح، فإن فهم الهيكل الأساسي للعظام والعضلات في الرأس أمر بالغ الأهمية. توفر الجمجمة الإطار للوجه، مما يؤثر على وضع وشكل الملامح. تتحكم العضلات في تعبيرات الوجه، مما يضيف عمقًا وواقعية لرسوماتك.
العضلات الرئيسية التي يجب معرفتها:
- عضلة الماسيتير (تغلق الفك)
- العضلة الدائرية للفم (تتحكم في حركة الشفاه)
- العضلة الوجنية الكبرى (عضلة الابتسامة)
- العضلة الجبهية (تجعد الجبين)
التعبير من خلال التشريح. تعبيرات الوجه هي نتيجة انقباضات العضلات تحت الجلد. من خلال فهم كيفية عمل هذه العضلات، يمكنك تصوير مجموعة واسعة من المشاعر بدقة. ادرس آلية الفم والعينين والحواجب لإنشاء بورتريهات مقنعة ومعبرة.
4. المستويات: تشكيل الشكل بالضوء والظل
من خلال هذه المستويات يمكننا تفسير الصلابة الحقيقية كما لا يمكن في أي طريقة أخرى.
من الدائري إلى المربع. بينما الرأس دائري في جوهره، فإن التركيز على المستويات يمكن أن يضيف هيكلًا وحيوية لرسوماتك. المستويات هي أسطح مسطحة تحدد الشكل وتخلق إحساسًا بالعمق. من خلال تبسيط الرأس إلى سلسلة من المستويات، يمكنك فهم كيفية تفاعل الضوء والظل مع سطحه بشكل أفضل.
المستويات الأساسية والثانوية. احفظ المستويات الأساسية للرأس، بما في ذلك الجبين والخدين والأنف والذقن. ثم، استكشف المستويات الثانوية التي تخلق تباينات دقيقة في الشكل. استخدم هذه المستويات كأساس لتصوير الضوء والظل، مما يخلق إحساسًا بالحجم والأبعاد.
اللون والقيمة. اللون هو تأثير الضوء على الشكل. الظلال هي أشكال تحدث على سطح الشكل. اجعل الأضواء والظلال بسيطة قدر الإمكان. ابدأ بتوجيه الضوء من مصدر واحد. لاحقًا، قد ترغب في إدخال بعض الإضاءة الخلفية، لكن لا تجعل كلا المصدرين يضيئان نفس المنطقة. هذا يخلق زيفًا في الإضاءة، وبالتالي شكلًا زائفًا، لأن الشكل موجود حقًا فقط كما يحدده الضوء، والظل، واللون المتوسط.
5. الشخصية والتعبير: إحياء الرؤوس
أفكارنا، مشاعرنا ومواقفنا، حتى نوع الحياة التي نعيشها، تسجل في وجوهنا.
الفردية في الوجوه. كل وجه فريد، يعكس أفكار الشخص ومشاعره وتجربته. انتبه للاختلافات الدقيقة في هيكل العظام، ونبرة العضلات، وملمس الجلد التي تساهم في الشخصية الفردية. استخدم هذه التفاصيل لإنشاء بورتريهات ليست دقيقة فحسب، بل أيضًا معبرة.
المبالغة من أجل التأثير. جرب المبالغة في بعض الملامح أو التعبيرات لإنشاء كاريكاتيرات أو بورتريهات مصممة بأسلوب خاص. يمكن أن تكون هذه طريقة ممتعة لاستكشاف أنواع مختلفة من الشخصيات وتطوير أسلوبك الفني الخاص. ومع ذلك، حافظ دائمًا على فهم قوي للتشريح والنسب لتجنب إنشاء رسومات مشوهة أو غير مقنعة.
الإيقاع والتصميم. الإيقاع في الرسم هو شيء تشعر به. يجب أن يرتبط الإيقاع ارتباطًا وثيقًا بالتصميم، وكل رأس له تصميم. هناك تدفق مرتبط من الخطوط، خط واحد يعمل مع أو ضد آخر. الإيقاع هو حرية في الرسم، حرية للتعبير عن الأشكال، ليس بدقة، ولكن في تناغم.
6. رسم رؤوس النساء: الرقة والدقة
الجاذبية تكمن في الرسم الأساسي.
ملامح أنثوية. عند رسم رؤوس النساء، أكد على الرقة والدقة. هيكل العظام والعضلات عادة ما يكون أقل بروزًا مقارنة برؤوس الرجال. استخدم خطوطًا رقيقة وانتقالات سلسة لخلق إحساس بالنعمة والجمال.
الشعر والأسلوب. انتبه لتسريحة الشعر وكيف تؤطر الوجه. غالبًا ما تكون المستويات البسيطة أكثر فعالية من رسم كل خيط أو تجعيد بدقة. اعتبر التصميم العام وكيف يساهم في شخصية البورتريه.
الشيخوخة برشاقة. عند رسم النساء الأكبر سنًا، كن لطيفًا ومحترمًا. ضع التجاعيد في المرتبة الثانية، لكن اعتبر الأشكال بشكل كبير. لقد تطورت أشكال جديدة في الخدين؛ تشير إلى الطريقة التي ترتبط بها العضلات في الداخل وتحت الجلد.
7. رسم رؤوس الأطفال: التقاط سحر الشباب
إذا تم فهم رأس الطفل، فإنه ليس من الصعب حقًا رسمه مثل أي رأس آخر، وأحيانًا ليس بالصعوبة نفسها.
نسب الأطفال. رؤوس الأطفال لها نسب مختلفة عن رؤوس البالغين. الوجه أصغر نسبة إلى الجمجمة، والملامح عادة ما تكون أكثر دائرية ونعومة. تبدو العيون أكبر وأكثر تباعدًا.
أربعة تقسيمات. قسم الوجه من الحواجب إلى الأسفل إلى أربعة أجزاء. تلامس العيون الخط السفلي من القسم العلوي. تلامس الأنف الخط السفلي من القسم الثاني. تقع زوايا الفم على الخط السفلي من القسم الثالث، وينخفض الذقن قليلاً تحت القسم الرابع أو السفلي.
روح الشباب. التقط روح الشباب وبراءة الأطفال في رسوماتك. انتبه لتعبيراتهم وإيماءاتهم، واستخدم مهاراتك الفنية لنقل سحرهم الفريد. تذكر أن الأطفال يتغيرون باستمرار، لذا من المهم مراقبتهم عن كثب والتقاط لحظاتهم العابرة من الجمال.
8. الأيدي: أدوات تعبيرية للجسد البشري
اليد هي الجزء الأكثر مرونة وقابلية للتكيف في كل التشريح.
الأيدي تروي قصة. الأيدي تعبر بشكل كبير ويمكن أن تنقل مجموعة واسعة من المشاعر والأفعال. ادرس تشريح اليد وتدرب على رسمها في أوضاع مختلفة لتطوير مهاراتك. انتبه للمنحنيات الدقيقة، والزوايا، والملمس الذي يجعل كل يد فريدة.
النسب والبناء. طول اليد يعادل تقريبًا طول الوجه من الذقن إلى خط الشعر. يصل الإبهام تقريبًا إلى المفصل الثاني من الإصبع الأول. يمكن عادةً رسم ظهر اليد في ثلاث مستويات - واحدة لجزء الإبهام حتى المفصل السفلي من الإصبع الأول، والاثنتان الأخريان عبر ظهر اليد، تتناقصان نحو المعصم.
تدرب باستخدام يديك. يديك هي أفضل مصدر لمادة مرجعية. ادرسها في أوضاع وظروف إضاءة مختلفة للحصول على فهم أعمق لشكلها ووظيفتها. استخدم هذه المعرفة لإنشاء رسومات واقعية ومعبرة للأيدي في بورتريهاتك ورسوماتك الجسدية.
ملخص المراجعات
كتاب "رسم الرأس واليدين" يتلقى تقييمات إيجابية في الغالب، حيث يثني القراء على تعليماته التفصيلية ورسومه التوضيحية الجميلة. يعتبره الكثيرون مصدرًا كلاسيكيًا للفنانين الذين يتعلمون كيفية رسم البورتريهات واليدين. يقدّر المراجعون تحليل لوماس للأسس الفنية ورؤاه حول كيفية تطبيق المعرفة في العمل الفني. يشير البعض إلى بعض الجوانب القديمة في الكتاب، خاصة فيما يتعلق بالتنوع وتمثيل الجنسين. بينما يجد معظم القراء الكتاب ذا قيمة عالية، يجادل بعض النقاد بأنه يفتقر إلى العمق في بعض المجالات أو يفضلون مصادر أخرى. بشكل عام، يظل نصًا موصى به على نطاق واسع للفنانين الذين يسعون لتحسين مهاراتهم.
قرأ الآخرون أيضًا

الأسئلة الشائعة
1. What is "Drawing the Head and Hands" by Andrew Loomis about?
- Comprehensive guide to drawing: The book is a classic instructional manual focused on teaching artists how to draw realistic and expressive heads and hands.
- Emphasis on construction: Loomis introduces a systematic, construction-based approach, using simplified forms like the ball and plane to build heads and hands accurately.
- Covers all ages and types: The book addresses drawing men, women, children, babies, and hands, providing specific advice for each.
- Practical and philosophical: Loomis combines technical instruction with motivational advice, encouraging artists to develop both skill and personal expression.
2. Why should I read "Drawing the Head and Hands" by Andrew Loomis?
- Foundational for artists: It’s considered essential reading for anyone serious about figure drawing, portraiture, or illustration.
- Time-tested methods: Loomis’s construction techniques are widely used by professionals and art schools for their effectiveness and clarity.
- Covers common challenges: The book addresses typical difficulties artists face, such as proportion, perspective, and placement of features.
- Inspirational tone: Loomis’s writing is encouraging, helping readers overcome impatience and frustration in their artistic journey.
3. What are the key takeaways from "Drawing the Head and Hands" by Andrew Loomis?
- Construction is crucial: Building heads and hands from basic forms ensures accuracy and consistency in drawing.
- Proportion and placement: Understanding the standard measurements and divisions of the head and hand is vital for realistic results.
- Anatomy matters: Even if you don’t memorize every bone or muscle name, knowing their placement and function improves expression and believability.
- Practice and experimentation: Loomis stresses the importance of drawing from life, photographs, and imagination, and encourages playful experimentation with types and expressions.
4. What is the Loomis Method for drawing heads, as described in "Drawing the Head and Hands"?
- Ball and plane approach: Start with a ball (cranium) and add a flattened plane for the face, establishing the head’s basic structure.
- The all-important cross: Draw a vertical and horizontal line (the “cross”) to determine the head’s orientation and the placement of features.
- Proportional divisions: Divide the face into equal thirds (hairline to brow, brow to nose, nose to chin) for accurate feature placement.
- Adaptable to any angle: The method allows you to construct heads in any pose or perspective by rotating the ball and adjusting the cross.
5. How does Andrew Loomis recommend learning to draw hands in "Drawing the Head and Hands"?
- Study your own hands: Loomis emphasizes using your own hands as the best reference for understanding structure and movement.
- Block forms and anatomy: Break the hand into blocky forms and learn the basic anatomy, focusing on the palm, fingers, and thumb.
- Proportional relationships: Learn the comparative lengths and alignments of fingers, knuckles, and palm for accurate drawings.
- Practice varied poses: Draw hands in different actions, from multiple angles, and in foreshortened views to build confidence and skill.
6. What are the main differences in drawing men’s, women’s, and children’s heads according to Andrew Loomis?
- Men’s heads: Emphasize blockiness, visible bone and muscle structure, and stronger planes for a more rugged look.
- Women’s heads: Use softer, rounder forms, less pronounced bone structure, and delicate features; still maintain underlying construction for accuracy.
- Children’s and babies’ heads: Proportions differ significantly—larger craniums, smaller faces, and wider-set eyes; features are rounder and less defined.
- Adjust for age and character: Loomis provides specific construction guides and proportion charts for each group, highlighting the importance of adapting your approach.
7. How does "Drawing the Head and Hands" by Andrew Loomis address facial expressions and character?
- Muscles and mechanics: Loomis explains the key facial muscles responsible for expressions, such as the “happy” and “unhappy” muscles.
- Construction first, expression second: Accurate placement of features within the head’s structure is essential before adding expression.
- Variety through spacing: By varying the proportions and spacing of features, you can create endless character types and expressions.
- Practice with mirrors and photos: Loomis suggests using mirrors and photographs to study and replicate a wide range of expressions.
8. What role does anatomy play in Andrew Loomis’s approach in "Drawing the Head and Hands"?
- Foundation for realism: Understanding the skull and muscles beneath the skin is crucial for believable heads and hands.
- Simplified for artists: Loomis focuses on the most important bones and muscles, emphasizing their placement and function over memorizing names.
- Expression and movement: Knowledge of anatomy helps artists depict natural expressions and dynamic poses.
- Applies to all ages: The anatomical approach is adapted for men, women, children, and babies, with attention to age-related changes.
9. How does Andrew Loomis teach the use of planes, light, and shadow in "Drawing the Head and Hands"?
- Planes define form: Loomis breaks the head into basic and secondary planes to clarify structure and guide shading.
- Light and shadow modeling: He explains how to use a single light source to create clear, simple shadows that reveal the form.
- Direction of strokes: In drawing, the direction of your pencil strokes should follow the planes to enhance the sense of volume.
- Avoid over-blending: Loomis warns against excessive blending, which can make drawings look flat or photographic rather than lively and solid.
10. What advice does Andrew Loomis give for developing rhythm and design in head and hand drawings?
- Rhythm is flow: Loomis encourages artists to seek the longest, most expressive lines in a head or hand, rather than focusing on small details.
- Use the whole arm: Drawing with the arm, not just the fingers, helps create rhythmic, confident lines.
- Combine curves and angles: Mixing blocky and rounded forms adds vitality and interest to drawings.
- Design over detail: Consider the overall design and pattern of lights, shadows, and forms for a more artistic result.
11. How does "Drawing the Head and Hands" by Andrew Loomis help artists overcome common drawing mistakes?
- Construction prevents errors: Starting with the ball and plane method ensures features are placed correctly, avoiding distorted faces.
- Emphasizes measurement: Loomis provides clear proportion guides and unit systems to help artists check their work.
- Encourages analysis: He suggests drawing construction lines over photos or clippings to understand and correct mistakes.
- Practice and patience: Loomis stresses that skill comes from repeated practice and learning from unsuccessful attempts, not from shortcuts.
12. What are the best quotes from "Drawing the Head and Hands" by Andrew Loomis and what do they mean?
- “May it give wings to your pencil, to carry you to the heights of good draftmanship.” — Loomis’s dedication, expressing his hope that the book will inspire artistic growth.
- “Let me say at the beginning that to draw a head effectively is not a matter of ‘soul searching’ or mind reading. It is primarily a matter of interpreting form correctly in its proportion, perspective, and lighting.” — Emphasizes the importance of technical skill over mystical talent.
- “The big difference between the completely amateur attempt and the well-grounded approach is that the beginner starts by setting eyes, ears, noses, and mouths into blank white space... We must somehow get into the third dimension of thickness.” — Stresses the necessity of constructing the head in three dimensions.
- “Skill is the ability to overcome obstacles, the first of which is usually lack of knowledge about the thing we wish to do.” — Encourages perseverance and learning as the path to mastery.
- “No ‘knack’ of drawing heads can compete with sound knowledge.” — Underscores the value of understanding over relying on tricks or shortcuts.
تحميل PDF
تحميل EPUB
.epub digital book format is ideal for reading ebooks on phones, tablets, and e-readers.